Subscribe

RSS Feed (xml)

Powered By

Skin Design:
Free Blogger Skins

Powered by Blogger

Showing posts with label UIX. Show all posts

Monday, May 19, 2008

Beyond the BI Graph Wizard

This post is aimed at BI Beans developers wanting to fully exploit all the features of the BI Beans Graph. Within JDeveloper the easiest way to create a new graph is to use the Graph Wizard. This will allow you to create a new query to populate the graph and also define the layout. The end result is an XML file within the BIDesigner. This XML file is stored on the local file system. Before deploying your application this XML file has to be copied to the remote catalog so your application can correctly locate and open it.

Once the graph has been created most of the properties relating to a graph are exposed using the customizer wizards that are part of the graph toolbar in JDeveloper. Using the GUI tools you can easily create a graph something like the one shown below, where the width of the lines has been increased and the colors for each line set to match a specific theme:
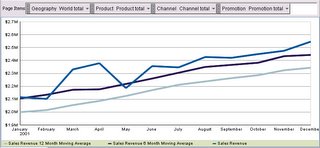

These are very basic customizations. However, the BI Beans graph does contain a lot of properties that are not covered by either the graph wizard or the customizers. There are three basic ways to access these additional properties:

1) Use the Structure and Properties panels in JDeveloper
2) Directly editing the graph XML file
3) Use the graph Java API


Method 1 : Using the Structure and Properties panels in JDeveloper

In JDeveloper the Structure and Properties panels can be used to view all the available graph properties. Once a graph is open in the JDeveloper graph editor, opening the Structure panel (Ctrl+Shift+S) will expose the all the structure of the graph bean:
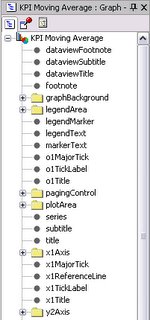

Some sections contain more detailed sections and are shown as drillable in the tree. For example the plotArea has an SFX section. This controls the Special Effects features. This is not exposed in the graph Wizard or the customizers, so the Properties panel has to be invoked to both view and modify these properties. To open the Properties panel use the (Ctrl+Shift+P) keystroke. The plotArea SFX has the following properties:

Using the SFX properties graph developers can add features such as background images to a graph. By setting the fillType, textureDisplay and textureURL properties it is easy to update the graph shown above by adding a background image as shown below:


In the actual graph XML file the following additional tags are added to control the SFX features:


Another feature that is only exposed via the Properties panel is the ability to wrap the text for the various title areas. In order to word-wrap long titles you simply select the required title in the structure panel, for example the Y1 Title:


The Property panel then exposes the options such as word wrap, text rotation, alignment etc. In the graph XML file the following entry would be added:


Method 2 : Directly editing the graph XML file

If you really want to push the boundaries the next step for customizing graphs is to directly edit the graph XML. As stated above, the graph definition is saved to an XML file within the BIDesigner directory on the local file store. Developers can use any text editor to open the file and add new XML tags or edit existing tags to customize the appearance of the graph. After saving the file, in JDeveloper you only need to reload the graph to view the results of the changes to the file.

The BI Beans graph is shipped with a DTD document that lists all the available XML tags. You can see the complete list of graph attributes inside the file 'graph.dtd'. This DTD file is located in your JDEVELOPER_HOME\bibeans\lib\bipres.jar. The WinZip utility can be used to unzip the contents of this JAR file and view the dtd document. For detailed information on these attributes, refer to the technical note available on OTN from the Reports Product Management Team:

http://www.oracle.com/technology/products/reports/htdocs/getstart/
whitepapers/graphdtd/graph_dtd_technote_2.html

This Technical Note explains all these attributes using comments within the graph.dtd. This document will help to explain the usage of these various attributes that provide more fine-grained customization of graphs.

Directly editing the XML provides more opportunities to customize the visual representations of a graph. For example, BI Beans Graph does not provide a graph type that just plots the trend as a series of floating bars. However, by directly editing the XML it is possible to generate a graph that does have floating bars as shown below:
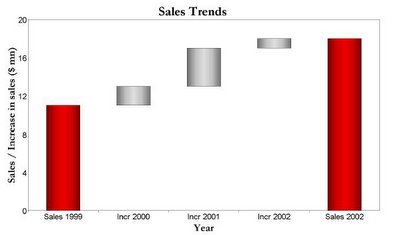


To do this is a two stage process. Assuming you have the following graph:


The first step is to add another series that clearly identifies the increase in sales for the years 2000-2002. Choose a stacked bar graph to show the two series. Your graph will now look like this:


Once this has been done, the next step is to add the following to the graph xml document:



The O1 axis tick mark style is defined so that the floating bars can be identified easily with their respective labels on the X-axis. The above XML entry will make one of the series transparent, and you will get a floating effect as shown below:
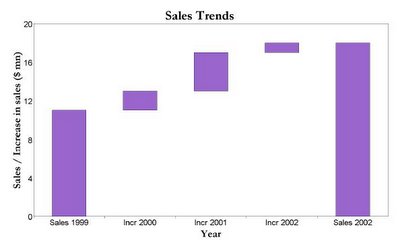


In order to show the total sales and increase in different colors, you will need to define exceptional risers. Exceptional risers are data markers that do not share series attributes, e.g., series color. Add the following to the Graph xml document to define exceptional risers:



This will change the color of the total sales bars as shown below:


To make the above graph look exactly like first graph with the nice red and silver bars some additional XML statements are required to modify the color codes used as part of the series definition and apply some special effects properties as well.


Method 3 : Using the graph Java API


The last method for interacting with the Graph bean is to use the Java API. This provides access to some interesting features such as the ability to set the bars or pie slices transparent. Currently the only way to set this property is to call the graph bean API using java code as follows:


DataAccess da = graph.getModel().getDataAccess();

int seriesCount = da.getEdgeExtent(DataDirector.ROW_EDGE);

for (int i=0; i

try{

graph.getSeries().setColor(new Color(red,green,blue,alpha), i);

}

catch (SeriesOutOfRangeException se){

System.out.println(" Series out of Bound Exception ");

}

}

This method uses the constructor for Color: Color(int r, int g, int b, int a) and creates an sRGB color with the specified red, green, blue, and alpha values in the range (0 - 255). The result is as follows:


Using BI Beans with non-OLAP data source

One of the largest threads currently running on the BI Beans forum relates to using BI Beans with non-OLAP data sources. Out of the box most of the BI presentation beans are wired to work with an OLAP data source. That OLAP data source can be derived from either a relational star/snowflake schema or an analytic workspace. The use of an OLAP data source against a relational schema requires additional metadata to be added in the form of registration of dimensions and cubes within the CWM repository.

In many cases the creation of this additional metadata may not be possible, so people have asked if it is possible to connect BI Beans to a non-OLAP data source. The answer is yes. The easiest way to do this is to use the BI Graph bean and connect this to an XML data source. This is relatively easy to do and as part of the BI Beans 10g samples we already provide a UIX example that shows how to connect a BI Graph bean to an XML data source. Now we have added a JSP example.

Using a very simple JSP page we can add a new BI Graph bean and render this with data from an XML data source. The code below shows the completed JSP page with all the require libraries and tags:


In this example the JSP page includes two key lines of code:

Line 1: helper.setGraphProperties(graph, "graph1.xml");
Line 2: helper.loadData(graph, false);

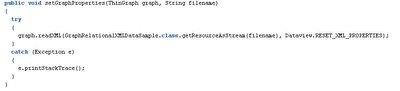
The first line sets the style properties for the graph. Below is the code used to load the style information and apply it to the graph:


For more information on setting the various graph properties and styles using the XML tags please refer to my previous posting “Beyond the BI Graph”. This can be found at the following URL:

http://all-siebel-info.blogspot.com/2008/05/beyond-bi-graph-wizard.html

The second line of code creates a connection to a non-OLAP data source for the graph and is contained within the same code library as the previous, code extract, GraphUIXSample.java. The loadData() method allows for two different types of connections. By passing the value of “false” as the last parameter the graph will be generated using data from an XML file, "helper.loadData(graph, false); ". This will call the following code:


This code loads an XML file that contains the following tags and data points:


which results in the following graph being displayed when the JSP is run:


By passing the value of “true” as the last parameter ( helper.loadData(graph, true) )the graph will be generated using data from a SQL statement. This will call the following code:


For this example we connect to the Scott schema and select data from the EMP table. The connection details to the instance are coded into this example; however, these could be stored and loaded from another file if required. Note here the lack of a BIDesigner connection, this is an area that also generates a lot of questions on the forum. There is no need to define a BIDesigner to make a non-OLAP connection. The connection is defined as per a normal ODBC connection.

The SQL statement is contained within a String object and is defined as follows:

String sqlQuery = "select DEPTNO, JOB, avg(SAL)from EMP group by DEPTNO, JOB";

Executing the query in a SQLPlus session will generate the following result:


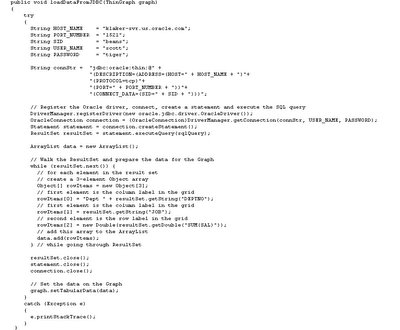
The query results are assigned to an array called “data” using a “while” loop to walk-through the result set. To assign the data to the graph the setTabularData() method is called:

graph.setTabularData(data);

Running the JSP page now will generate the same style of graph as before, however, the data will now be sourced from the EMP table and will appear as follows:


UIX Hack 4 - Removing the worksheet breadcrumb

A Discoverer forum post on OTN last week asked how to remove the had a query on how to remove the worksheet breadcrumb from the Viewer page. You cannot do that by using the Viewer customizations feature available from the App Server Control (see Section 9.2 - Customizing Discoverer Viewer - of the Oracle® Business Intelligence Discoverer Configuration Guide, 10g Release 2 (10.1.2.1) for Microsoft Windows and Solaris Operating System (SPARC), Part No. B13918-03, link to doc on OTN ----> http://download-uk.oracle.com/docs/html/B13918_03/customize.htm#BABIBFGD). You can however do a lot of other customizations to the layout, and the look and feel.

To remove the breadcrumb, you have to get your hands dirty with UIX (see links to previous posts on UIX and UIX hacks in Discoverer at the end of this post).

Before I get into what is required (and it is really quite simple), I must warn you on two points:

  • Such hacks are not supported and not encouraged. Why? Because Oracle Support will insist you reproduce any problem you have with your Discoverer installation WITHOUT these hacks. You cannot call/contact Oracle Support for any, and I repeat ANY, issues you may run into as a result of using these hacks. These hacks are not fully tested, nor are they guaranteed to work on all combinations of platforms. Any upgrade or patch you may apply to your Discoverer installation will most likely overwrite these customizations. And finally, because we do not guarantee that we will continue to use UIX in future releases. So any effort you expend into gaining UIX expertise for the purposes of Discoverer customizations may likely be useless in the future.
  • Ok, I only had one point, albeit a long-ish point. Well, no! I do have a second point!!. The second point is that if you do create an unsightly furor over any problems with UIX hacks, I shall get into trouble, and shall most certainly be proscribed from writing on these hacks.
Ok, I have carried out my duty about warning you in letter and spirit. Let's move on with the hack now, shall we?

The offending breadcrumb in question is shown below, circled in red.
To remove this, you need to edit a UIX file. The file is located under the following folder: C:\ias\j2ee\OC4J_BI_Forms\applications\discoverer\discoverer. c:\ias is the folder on my machine where Discoverer is installed. Under this folder is a file named 'Worksheet.uix' (intuitive, isn't it?). First, make a backup of this file. Which can be as simple an operation as doing a copy-and-paste if you are using Microsoft Windows. Once this backup has been made, open the worksheet.uix file using a text editor like Notepad, vi, TextPad, etc...
Browse down the file till you find the line that starts with
Select this line, and delete all lines starting with this line till the line that starts with
, including this last line also. Save the file, re-start your OC4J_BI_Forms instance, and re-start Viewer. You should not see the breadcrumb any longer.

An alternative, and a simpler alternative at that, is to find the line that says:

Change this to:

Save the file, re-start your OC4J_BI_Forms instance, and re-start Viewer. You should not see the breadcrumb any longer.
If things didn't blow up to high heaven, the breadcrumb should no longer be visible.
Related UIX Hacks posts:
uix-hack-1-removing-connect-directly
uix-hack-2-remove-last-refresh-date
uix-hack-3-removing-type-column-from

UIX Hack 3 - Removing the 'type' column from a portlet

This came up recently on the OTN Discoverer forum ----> http://forums.oracle.com/forums/forum.jspa?forumID=56, where the poster asked how to remove the 'type' column from the List of Worksheets portlet.
"Is there a way to remove the "Type" column from Discoverer List of Worksheets portlet? I can see where to remove Modified Date, Creation Date, etc., but it doesn't from there allow me to remove the "Type" column. My users don't care whether it's a Workbook or Worksheet, and it's taking up valuable page real estate."

While there is no way to remove this using the UI, yet (there is a reason why the 'type' column is mandatory), UIX makes it possible to remove this column.

See my earlier posts about UIX and some other UIX hacks - "UIX Hack 1 - Removing the 'Connect Directly' section" and "UIX Hack 2 - Remove the Last Refresh Date from Discoverer Portlets".

And very importantly, here is the disclaimer, and warning:

  • I am NOT suggesting that you go around and muck with these UIX files.
  • Any changes you make to UIX files are unsupported.
  • Oracle Support will not support your installation if you run into problems as a result of making changes to these UIX files.
  • You will have to reproduce any errors on an instance without these UIX changes for Oracle Support to help you.
  • Any upgrades or patches you apply may overwrite custom changes you make to your UIX files.
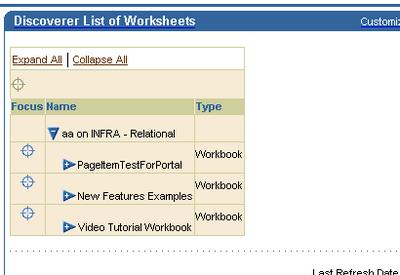
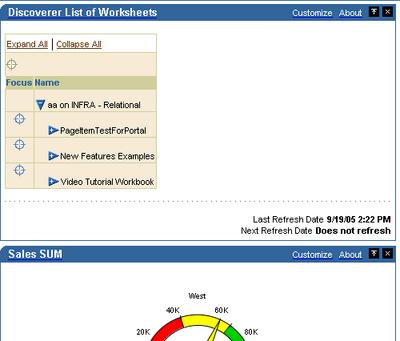
Take the screenshot below, where you have a simple List of Worksheets Discoverer portlet. What you do not want is for the 'Type' column to appear.

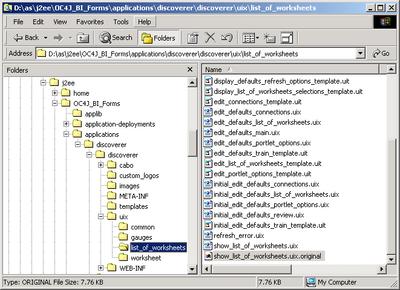
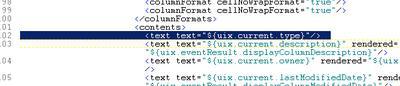
The UIX file you have to edit is located under your installation's "\j2ee\OC4J_BI_Forms\applications\discoverer\discoverer\uix\list_of_worksheets" folder, as shown below. The file you have to edit is "show_list_of_worksheets.uix". Note that I have made a backup of my file, BEFORE doing any editing - as should you.There are two (2) lines of code that you have to remove, as shown below.

and


Be sure to delete only two lines, and the correct ones, as shown above.

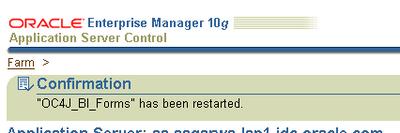
After you are done deleting these two lines, save and close the file. Then go to your Application Server Control and restart your 'OC4J_BI_Forms' component. Once the component has been restarted, refresh your Portal page.
If you did everything right, and there really wasn't all that much to it anyways, your LOW portlet should now look like the image below: just the worksheet/workbook name and no 'type' column.
UIX Hack 2 – Remove the Last Refresh Date from Discoverer Portlets

The Last Refresh Date/Time and Next Refresh Date-Time stamp that appears at the bottom right of every Discoverer portlet may not always be required by people, for a variety of different reasons. It can take up screen real estate; people don’t really care about this field and would rather not see it. For whatever reasons, it may not be required in all cases.

Removing it is relatively simple – provided you are willing to indulge in a little bit of UIX editing. Ok, so it not supported, nor would I advise you to go about hacking your way through UIX files. But, if you feel confident enough, this is a relatively simple exercise.

You can read my earlier post about UIX and the caveats that apply.
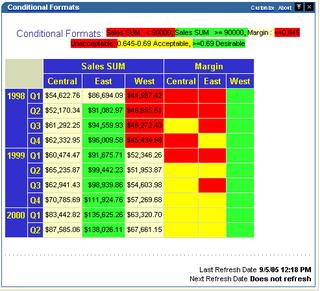
This is a Discoverer worksheet portlet, with the date-time stamped at the bottom right corner.

If you want to remove this from the Discoverer worksheet portlet – i.e. if you do NOT want this value to appear on ANY Discoverer worksheet portlet, you have to modify one file. The file name is ‘show_worksheet.uix’ and is located under your Oracle home's \j2ee\OC4J_BI_Forms\applications\discoverer\discoverer\uix\worksheet folder. In my case, I am using the phase 2 release of the app server (10.1.2.0.2) (see earlier posts - 1, 2, and 3), and therefore Discoverer is installed in the same Oracle home as my app server.
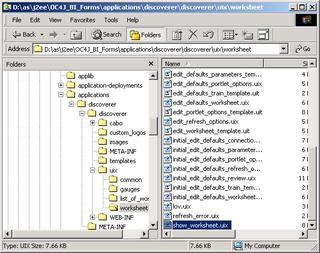
Make a backup of this file BEFORE you do anything further.


Now that you have made a backup of this file, open it using a text editor like Notepad, TextPad, JEdit, etc…
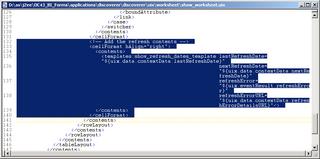
Look for the lines highlighted above (hint: search for the string ‘refresh contents’).

Delete the highlighted lines as shown above.

Save and close your file.

Re-start your OC4J_BI_Forms instance (use your OEM App Server Control for that).

Refresh your Portal page (you may need to close your browser and re-login to Portal in case you have issues with your browser cache).
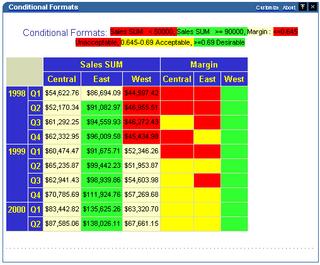
You can also choose to remove this date-time for all kinds of Discoverer portlets – List of Worksheets and Gauges portlets too, but that is a post for another day (relatively simple, actually).

UIX Hack 1 - Removing the 'Connect Directly' section

What is UIX?
This is what Oracle says about UIX: "UIX is an extensible, J2EE-based framework for building web applications. It is based on the Model-View-Controller (MVC) design pattern, which provides the foundation for building scalable enterprise web applications. UIX is server-based and supports a variety of clients, including web browsers and mobile devices. While UIX is based on Java technology, Java is not required on the client."

There is a lot of very useful information on OTN as well as on Jonas Jacobi's blog at http://www.orablogs.com/jjacobi/ and I would suggest you spend time going over it if you are so inclined. In particular, these are good posts to read:

  • Is ADF UIX a new technology? ( http://www.orablogs.com/jjacobi/archives/000111.html )
  • What is ADF UIX?( http://www.orablogs.com/jjacobi/archives/000110.html )
  • Roadmap for the ADF UIX technology and JavaServer Faces ( http://www.oracle.com/technology/products/jdev/collateral/papers/9.0.5.0/adfuix_roadmap/adfuix_roadmap.html )
This post is not about UIX, in case you were wondering. However, this post --is-- about how to modify Discoverer UIX files to change certain aspects of your Discoverer web pages. Discoverer Viewer pages and portlets are rendered using UIX rather than XSL in 10.1.2. If you want to make changes to the look and feel and more to your Viewer pages or Discoverer Portlets, beyond what is provided by the App Server Control's Viewer customization capabilities, you have to change these UIX files. I keep getting asked a lot on the kinds of changes that can be made, and how to make certain changes, like remove the 'Connect Directly' link, etc...
Most of these changes are fairly straightforward to make if you spend a little time looking and going over these UIX files, and I am going to try and cover a few of the more popular requests in this blog over the coming weeks.

Before I proceed any further, I have to make this standard disclaimer:
  • I am NOT suggesting that you go around and muck with these UIX files.
  • Any changes you make to UIX files are unsupported.
  • Oracle Support will not support your installation if you run into problems as a result of making changes to these UIX files.
  • You will have to reproduce any errors on an instance without these UIX changes for Oracle Support to help you.
  • Any upgrades or patches you apply may overwrite custom changes you make to your UIX files.
Ok, on with what this post is really about.
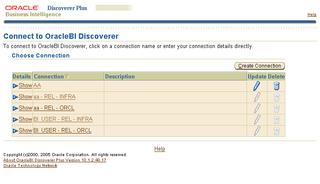
Assuming that you have associated your Discoverer middle-tier with an infrastrucure, and therefore have public/private/SSO connection functionality, when you connec to Discoverer Plus or Viewer, you are presented with two ways to connect to Discoverer.
The first one is by using a pre-defined public or private connection.
The second way is by entering the connection information directly.
Ok, there is a third way also, of using URL parameters, but let's forget that for a minute.

But what happens if you do not want to present users with the option to connect directly at all? To do this you have to make a minor change in a UIX file.

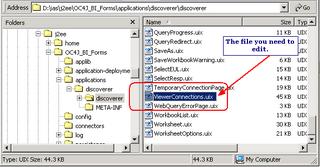
The file to change is under your Discoverer middle-tier's installation folder. If you have installed Discoverer under 'D' drive under a folder named 'ias', the actual path would be D:\ias\j2ee\OC4J_BI_Forms\applications\discoverer\discoverer

The file you need to edit is ViewerConnections.uix

Note: Make a backup of this file before you begin. Make a backup of this file before you begin. In case you weren't paying attention; Make a backup of this file before you begin!

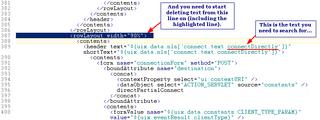
Open this file in a text editor like Notepad, TextPad, JEdit, etc... and locate the following lines where this piece of text appears: "connectDirectly"

You can use the line numbers in the screenshot above as a guide to where in the file you would find the text.
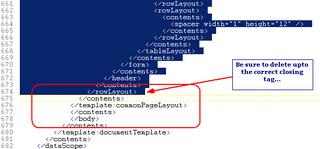
You have to delete a lot of lines now, as shown below.
Start with the line that begins with <rowLayout width="90%"> two lines above the 'connectDirectly' text that you were searching for. Now scroll all the way down in the file (almost 300 lines down) till you find the closing tag for the <rowLayout width="90%"> tag above. You will know you have found the correct closing tag because it will be followed by the closing tags on the succeeding lines as shown in the screenshot below, and also because the indentation will look 'even'. and


Save the file (you DID make a backup of this file, right?!).

Restart your middle-tier's OC4J_BI_Forms component.

Close your browser, open a fresh browser window, and open the Discoverer connections page (http://yourservername.com:portnumber/discoverer/viewer or /plus)

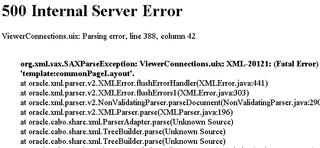
If you do screw up (like I did the first time), you will see this nice pretty "500 Internal Server Error" screen.

However, if you did do this right, you should see your new Discoverer connections page, without the 'Connect Directly' option.

Since both Plus and Viewer use the same screen, the change will be visible on both the Plus and Viewer screens.

To undo your changes, simply delete your existing ViewerConnections.uix file and copy the backup file you made as ViewerConnections.uix.

Warning: Do not try this without adult supervision. The material described here is intended for mature audiences, reader discretion is advised. Seriously, these hacks are not supported; use them with caution and common sense. See my disclaimer above.

Featured Video