

What is UIX?
This is what Oracle says about UIX: "UIX is an extensible, J2EE-based framework for building web applications. It is based on the Model-View-Controller (MVC) design pattern, which provides the foundation for building scalable enterprise web applications. UIX is server-based and supports a variety of clients, including web browsers and mobile devices. While UIX is based on Java technology, Java is not required on the client."
There is a lot of very useful information on OTN as well as on Jonas Jacobi's blog at http://www.orablogs.com/jjacobi/ and I would suggest you spend time going over it if you are so inclined. In particular, these are good posts to read:
- Is ADF UIX a new technology? ( http://www.orablogs.com/jjacobi/archives/000111.html )
- What is ADF UIX?( http://www.orablogs.com/jjacobi/archives/000110.html )
- Roadmap for the ADF UIX technology and JavaServer Faces ( http://www.oracle.com/technology/products/jdev/collateral/papers/9.0.5.0/adfuix_roadmap/adfuix_roadmap.html )
Most of these changes are fairly straightforward to make if you spend a little time looking and going over these UIX files, and I am going to try and cover a few of the more popular requests in this blog over the coming weeks.
Before I proceed any further, I have to make this standard disclaimer:
- I am NOT suggesting that you go around and muck with these UIX files.
- Any changes you make to UIX files are unsupported.
- Oracle Support will not support your installation if you run into problems as a result of making changes to these UIX files.
- You will have to reproduce any errors on an instance without these UIX changes for Oracle Support to help you.
- Any upgrades or patches you apply may overwrite custom changes you make to your UIX files.
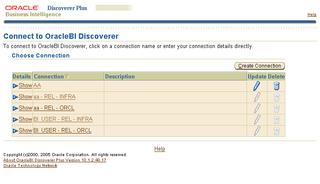
Assuming that you have associated your Discoverer middle-tier with an infrastrucure, and therefore have public/private/SSO connection functionality, when you connec to Discoverer Plus or Viewer, you are presented with two ways to connect to Discoverer.
The first one is by using a pre-defined public or private connection.
The second way is by entering the connection information directly.
Ok, there is a third way also, of using URL parameters, but let's forget that for a minute.
But what happens if you do not want to present users with the option to connect directly at all? To do this you have to make a minor change in a UIX file.
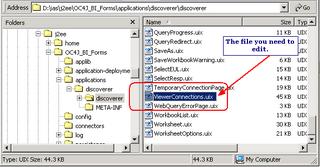
The file to change is under your Discoverer middle-tier's installation folder. If you have installed Discoverer under 'D' drive under a folder named 'ias', the actual path would be D:\ias\j2ee\OC4J_BI_Forms\applications\discoverer\discoverer
Note: Make a backup of this file before you begin. Make a backup of this file before you begin. In case you weren't paying attention; Make a backup of this file before you begin!
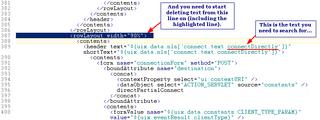
Open this file in a text editor like Notepad, TextPad, JEdit, etc... and locate the following lines where this piece of text appears: "connectDirectly"
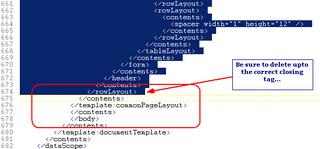
You have to delete a lot of lines now, as shown below.
Start with the line that begins with <rowLayout width="90%">
Save the file (you DID make a backup of this file, right?!).
Restart your middle-tier's OC4J_BI_Forms component.
Close your browser, open a fresh browser window, and open the Discoverer connections page (http://yourservername.com:portnumber/discoverer/viewer or /plus)
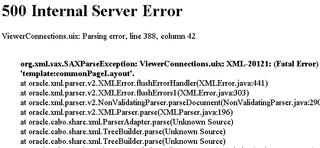
If you do screw up (like I did the first time), you will see this nice pretty "500 Internal Server Error" screen.
To undo your changes, simply delete your existing ViewerConnections.uix file and copy the backup file you made as ViewerConnections.uix.
Warning: Do not try this without adult supervision. The material described here is intended for mature audiences, reader discretion is advised. Seriously, these hacks are not supported; use them with caution and common sense. See my disclaimer above.


0 comments:
Post a Comment